3 Amazon IoT Button Hacks
The Amazon IoT button is an amazing little device. It can run for about 1000 button presses from the built in lithium AAA battery. It’s easy to connect it to the local WiFi network. But you don’t have to limit yourself to just pressing the button. I present to you 3 additional uses that require only a modest amount of hacking.
Three Amazon IoT Button Uses
I’ve ordered the project from simplest and fastest all the way up to simple and fast. But if you don’t know which end of the soldering iron gets hot, then stick with the first project.
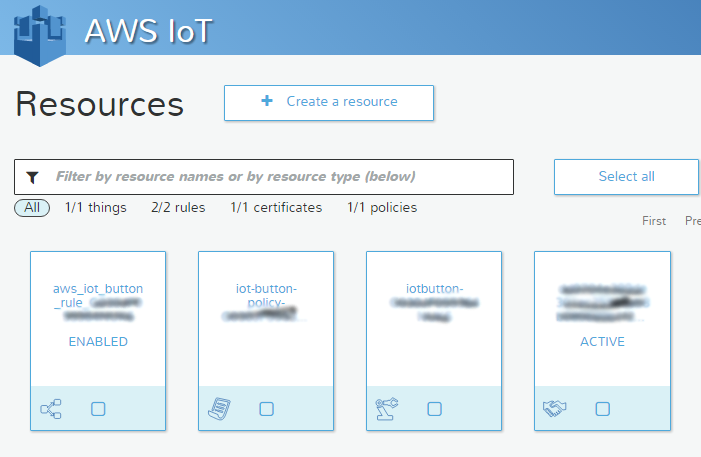
AWS IOT console setup. (The blurred text protects my button)
Door Bell
Stick the Button by your front door (maybe with a label that says “Door Bell”) I have it set up through IFTTT to send me a text, “Somebody is at the front door.” Follow the instructions on the Amazon Button page.
Your Amazon Iot Console should look something like the picture on the right.
Let’s Get Hacking
Prelude – How to safely crack open the “no customer serviceable parts inside” case.
- Remove cover label. You can catch a corner by the tiny microphone hole with the sharp tip of a knife. The label peels off.
- Remove three Torx #5 screws.
- Crack case. Again using a sharp knife tip, carefully wiggle the blade in at the rounded end next to the big button. Don’t do this at the other end because there are electronics close to the edge.
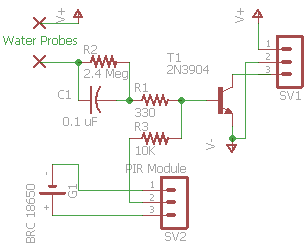
Schematic for both the flood alarm and motion sensor.
The next two hacks bypass the button. A simple additional circuit is added. To prepare solder an access wire to
- the battery plus terminal,
- the battery minus terminal and
- to test point TMF27, which is next to the microswitch that is under the big button. There is a via over part of the ‘7’ which makes it a bit hard to read the number.
Flood Alarm

Flood Alarm using Amazon IoT Button
Here the Button is in my basement, in the utility room. A drop of water simulates a button press, which triggers a rule and texts me, “Flood alarm!” The V+ battery voltage causes a small amount of current to flow into the base of the transistor when water is present at the water probe. R1 is a current limiting resistor which protects the T1 if the probes are shorted together. T1 can be either a 2N2222 or 2N3904 or pretty much any NPN silicon transistor with a gain of around 100. C1 gives a spike or pulse so that the button is only single pressed. SV1 is the connector to the Amazon IoT Button. Pin 1 is the battery +, Pin 2 is the battery -, and Pin 3 goes to test point TMF27, R2 provides a discharge path for C1. (R3, SV2 and G1 are are part of the motion detector and not used for the flood alarm.)
Motion Sensor
A inexpensive HC-SR501 PIR motion sensor is powered by a lithium battery. The PIR motion sensor uses very little current and the 18650 battery should last for years before it needs to be recharged. Again, just about any 3.6 volt lithium battery should work. The 18650 is what I had handly. The PIR motion detectors cost only about a dollar on eBay. R3 provides current limiting to the base of T1, which inverts the signal so that it looks like a button press. The 18650 battery + goes to the pin marked Vcc on the PIR. Likewise, battery – goes to the pin marked GND. Finally the PIR out pin goes to the base of the transistor through R3.
Oh! and I just noticed an error on the schematic. The 18650 battery – goes to pin 2 of SV1. In other words, the ground of the two batteries in the system needs to be connected. The PIR sensor has two setting pots. Set the X1 to minimum (all the way counterclockwise) and the SX pot to the desired sensitivity. The output is sent to the Button. IFTTT texts me, “Movement detected!” The water probe, R2, C1 and R1 are not used for the motion sensor circuit.
Keep in mind that the Amazon IoT button is only good for about 1000 motion detects. This is fine if you are only expecting a few motion triggers a day, but the circuit will only last months or weeks if there are frequent triggers. In case of frequent triggers, you may want to build a power supply. As it says in the text books, “That exercise is left to the reader.”
So, dear reader, does this post give you ideas about what else you can do with an Amazon IoT Button? Let me know!
Update June 20, 2016
Here are two more uses for the IoT button
- A better mouse trap. Modify a regular spring loaded bar mouse trap with a contact closure. The contact closure, of course is picked up by the IoT button by capacitive coupling. This signals that a mouse is ready for “disposal” and that the trap needs to be reset.
- A tapping sensor switch similar to the Knocki. I’m speculating that a piezoelectric energy harvester can trigger the IoT button the knock pattern for a single tap. double tap and maybe even long press. If the piezoelectric sensor does not provide enough energy to trigger the IoT button then we can use a ultra low power op amp to boost the signal.