Beyond NEST – Wood Fireplace Insert and Pellet Stove Controller
Previously, I had experimented with an Arudino Uno based fireplace insert blower controller. That experiment evolved in having two displays – one for the time and temperature, another for a graph showing temperature over time.
But, it makes sense to combine the two displays in the previous design into one display. A common, inexpensive display available are 240×320 TFT LCD displays based on the ILI9341 chips. The one I got from Banggood (I couldn’t make up a name like that if I tried!) plugs directly on an Arduino Uno. However, this makes it difficult to find pins for the thermocouple interface. So, I upgraded to an Arudino Mega, which gives me more memory, and oodles of spare I/O ports.
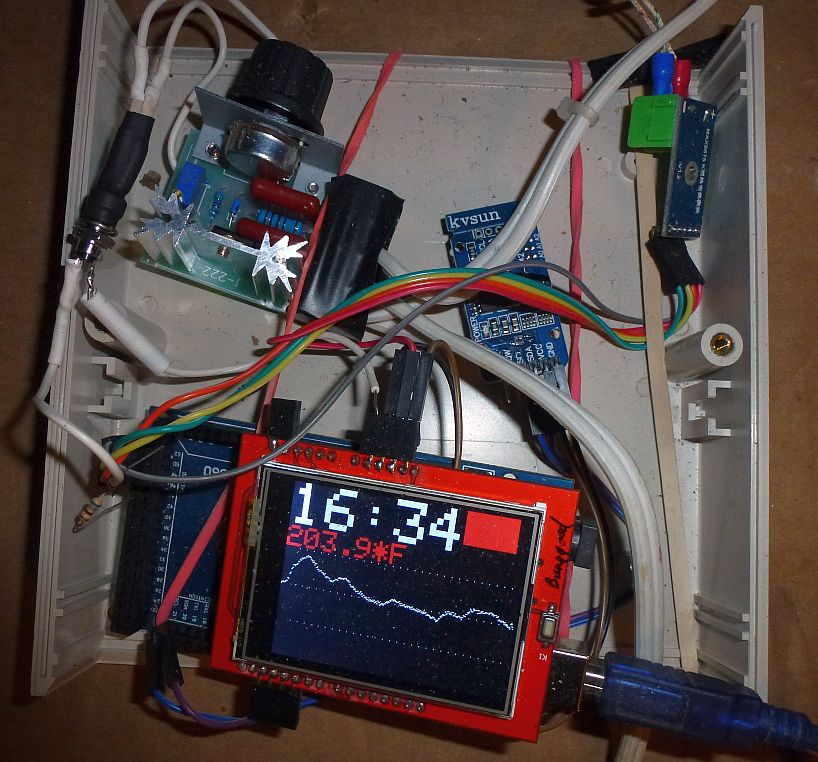
Wood Fireplace Insert Blower controller with graphic display – double click to enlarge.
Note in the picture that the display the time is shown on the first line, temperature on the second line, and then time vs temperature graph below that.
Temperature is graphed once a minute, which makes it easy and entertaining to see the temperature hump created by throwing in a log. A grid with blue dots every 10 minutes and white dots every hour further helps give structure to the graph. Horizontal dots are 50 degrees Fahrenheit intervals. I personally find this graph quite useful for figuring out when, and how big a log to throw on the fire. However, I’m sure I’m going to be dinking with the user interface for quite a while to come.
The DS3231 real time clock (RTC ) from the previous design continues to be on the I2C bus, which is also more accessible with the Mega because the I2C pins are brought out in a second location that is not blocked by the LCD shield.
A few months ago, I did a survey of digitally controlled fan controllers. All the designs seemed more complex and expensive than I though necessary. When I found a AC motor speed controller on eBay for about 2 bucks, I ordered one. In the mean time, I saw a post about using a LDR (Light Dependent Resistor) to complement the variable resistor (Pot) and thought I’d give that a go. By the way, I left the pot in the circuit, so I can bypass the Arduino if I want.
I came up with an Arudino interface consists of a green LED shining onto the LDR , both of which cost about a nickle on eBay. What I don’t understand is why a commercial version (Vactec or Vactrol) of this type of opto-coupler cost $6, when I can build one myself for 2 parts costing a dime, plus a bit of heat shrink tubing. It did not hurt that I already had these parts in my “junk” box. The transfer function my home brew unit is also quite linear if graphed on a log/log scale. The opto-coupler is the nearly vertical black cylinder on the upper left of the picture. However, it’s taking a bit of experimenting to get a good dynamic range and resolution when coupled with the $2 motor speed controller. Selecting the right series resistance for the LED is the key. The LDR has a lot of useful smoothing capacitance and can handle a higher voltage than your typical opto-coupler. The lDR capacitance is useful because the so called Arduino “analog” output is actually pulse width modulation at 750 Hz.
My other reason for creating a second prototype is that I have a pellet stove with a blown controller board in the basement. What it takes to fix it is a blower speed controller – and I now have two working prototypes.
I did a bit of market research and it appears that the market for pellet stoves and fireplace inserts are on the order of hundreds of thousands of units sold in the USA per year. Perhaps there is a path to commercializing my design? I’m going to have to give the design of a demo worthy case some thought.