Case Study: Off-The-Shelf Parts Make for Rapid Prototyping
Off the shelf components make for a quick prototype
My client wanted to be able to monitor a number of environmental parameters and then respond by turning pumps, fans and heaters on or off. The end result was a optimal plant growth environment in a mini-greenhouse.
I had previously experimented with a odroid Show2. This Arduino Uno type device features a 2.2 inch, 240 x 320 pixel display, 3 switches, 3 LEDs, LiPo battery charging circuit, and a I2C breakout header. There was also a daughter board that turned the Show2 into a weather station.
I realized that this could be the basis for a simplified version of the controller that my client was looking for. By adding additional I2C sensors, and a I2C to 8 bit output, I could take the required readings and turn up to 8 relays on and off.
The client had been working on getting a Beaglebone Black programmed as the brains, but progress was slow. By implementing this “quick and dirty” off-the-shelf prototype, we got a test bed that allowed for faster design considerations. This then gave the project the momentum needed to then make rapid progress.
Arduino IDE and open source rocks!
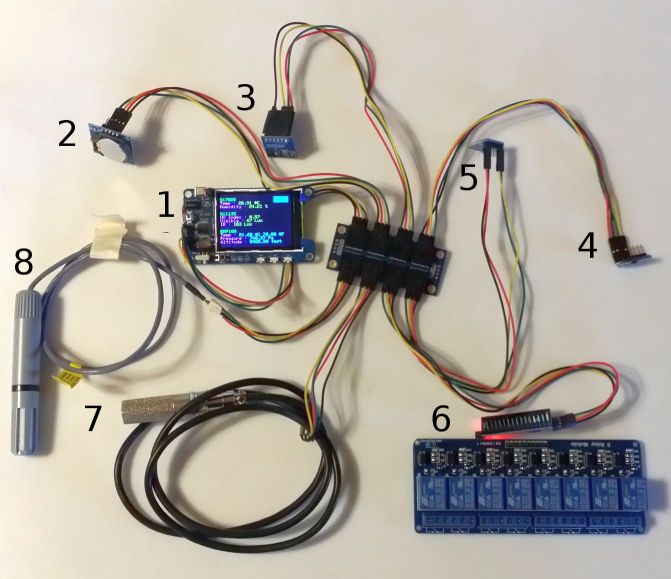
Refer to the above picture for described function:
Not numbered is the “octopus” I2C patch board in the middle. It distributes the I2C bus which is controlled by the display board to the various sensors and outputs.
1. The odroid Display2 is running the (slightly modified) weather program. In this example it is powered by a battery that is glued to the back of the display.
The display is showing the current values from the 3 weather board sensors. Those readings are the “indoor” temperature & humidity, ultraviolet & visible & infrared light levels, temperature (again in both Celsius and Fahrenheit) & pressure & equivalent altitude in feet.
2. Real time clock (RTC) module with button battery. I add this so that the Arduino specs are consistent with Beaglebone specs. Note that the RTC battery typically has a life of 2 to 5 years – at which point it needs to be replaced.
3. The weather board has been relocated from it’s designed position as a daughter board to the display board to a leg of the I2C patch panel. It has the sensors that are currently showing on the display board. The fact that the sensors read correctly indicates that the I2C bus is working properly with the approximately 11 feet of wiring shown in the picture. Although the I2C buss was originally intended for communication between different corners of a PCB, it appears it can be used for longer distances too. At some point I may go back and see how far I2C can practically reach.
4. “Water” temperature sensor. Note that it needs to ruggedized. My intent was to mount it to the outside of the water storage bladder that is in the base of the greenhouse and cover it with a spot of insulation.
5. “External” visible and IR light sensor. As an alternative, this could be the internal sensor because it does not measure UV. The weather board light sensor DOES measure UV. This is significant because the UV will not penetrate through plastic, but it may be helpful to know the UV level “outside.” Personally, I use the UV sensor as guidance for how long to stay out in the mid-day sun.
6. Relay board. The I2C port extender board connects to the relay board with 10 (8 signal + 2 power) wires (not shown.)
7. Ruggedized soil humidity and temperature with 3 foot cable. Adafruit cautions that this $50 sensor should not be immersed in water for more than an hour.
8. Ruggedized “External” air temperature and humidity with 18 inch cable. This is a $30 sensor.